# 准备
sudo apt install build-essential | |
sudo apt install qemu | |
sudo apt install libncurses5-dev bison flex libssl-dev libelf-dev |
# 下载内核源码
sudo apt install axel | |
axel -n 20 https://mirrors.edge.kernel.org/pub/linux/kernel/v5.x/linux-5.4.34.tar.xz | |
xz -d linux-5.4.34.tar.xz | |
tar -xvf linux-5.4.34.tar | |
cd linux-5.4.34 |
# 配置内核选项
make defconfig # Default configuration is based on 'x86_64_defconfig' | |
make menuconfig # 打开 debug 相关选项 |
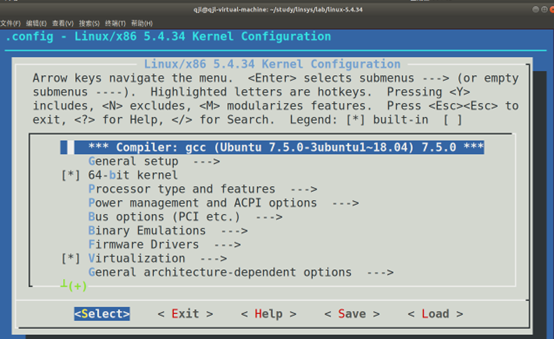

进行如下设置:
Kernel hacking —> | |
Compile-time checks and compiler options —> | |
[*] Compile the kernel with debug info | |
[*] Provide GDB scripts for kernel debugging | |
[*] Kernel debugging | |
关闭KASLR(随机地址),否则会导致打断点失败。 | |
Processor type and features ----> | |
[ ] Randomize the address of the kernel image (KASLR) |
# 编译运行内核
make -j$(nproc) | |
qemu-system-x86_64 -kernel arch/x86/boot/bzImage |
# 制作内存根文件系统
#首先从 https://www.busybox.net 下载 busybox 源代码解压,解压完成后,跟内核一样先配置编译,并安装。 | |
axel -n 20 https://busybox.net/downloads/busybox-1.31.1.tar.bz2 | |
tar -jxvf busybox-1.31.1.tar.bz2 | |
cd busybox-1.31.1 | |
make menuconfig #Setting 里的 Build static binary (no shared libs) 选中 |
然后编译安装,默认会安装到源码目录下的 _install 目录中。
make -j$(nproc) && sudo make install |
然后制作内存根文件系统镜像:
mkdir rootfs # 在/linux-5.4.34文件夹下新建rootfs文件夹
cd rootfs
cp ../busybox-1.31.1/_install/* ./ -rf
mkdir dev proc sys home
sudo cp -a /dev/{null,console,tty,tty1,tty2,tty3,tty4} dev/
准备 init 脚本文件放在根文件系统跟目录下(rootfs/init),添加如下内容到 init 文件。
#!/bin/sh | |
mount -t proc none /proc | |
mount -t sysfs none /sys | |
echo “Wellcome qjliOS!” | |
echo “--------------------” | |
cd home | |
/bin/sh |
给 init 脚本添加可执行权限:
chmod +x init |
打包成内存根文件系统镜像:
find . -print0 | cpio --null -ov --format=newc | gzip -9 > ../rootfs.cpio.gz |
测试挂载根文件系统,看内核启动完成后是否执行 init 脚本。
qemu-system-x86_64 -kernel ./arch/x86/boot/bzImage -initrd rootfs.cpio.gz |
出现 “Wellcome qjliOS!” 则 init 脚本执行成功。
# VSCode 配置 Linux 内核调试环境
由于 Linux 内核高度定制化,所以没有办法直接通过配置 includePath 等让 Intellisense 正常提示,这里借助一个 Python 脚本来生成 compile_commands.json 文件帮助 Intellisense 正常提示(包括头文件和宏定义等)。在 Linux 源代码目录下直接运行如下命令就可以生成 compile_commands.json 了。
python ./scripts/gen_compile_commands.py |
新建一个.vscode 文件夹,将配置文件放入该文件夹内,配置如下五个文件:c_cpp_properties.json,init,launch.json,settings.json,tasks.json。
c_cpp_properties.json
{ | |
"configurations": [ | |
{ | |
"name": "Linux", | |
"includePath": [ | |
"${workspaceFolder}/arch/x86/include/**", | |
"${workspaceFolder}/include/**", | |
"${workspaceFolder}/include/linux/**", | |
"${workspaceFolder}/arch/x86/**", | |
"${workspaceFolder}/**" | |
], | |
"cStandard": "c11", | |
"intelliSenseMode": "gcc-x64", | |
"compileCommands": "${workspaceFolder}/compile_commands.json" | |
} | |
], | |
"version": 4 | |
} |
init
#!/bin/sh | |
mount -t proc none /proc | |
mount -t sysfs none /sys | |
echo "Wellcome qjlOS!" | |
echo "--------------------" | |
cd home | |
/bin/sh |
launch.json
{ | |
// Use IntelliSense to learn about possible attributes. | |
// Hover to view descriptions of existing attributes. | |
// For more information, visit: https://go.microsoft.com/fwlink/?linkid=830387 | |
"version": "0.2.0", | |
"configurations": [ | |
{ | |
"name": "(gdb) linux", | |
"type": "cppdbg", | |
"request": "launch", | |
"preLaunchTask": "vm", | |
"program": "${workspaceRoot}/vmlinux", | |
"miDebuggerServerAddress": "localhost:1234", | |
"args": [], | |
"stopAtEntry": true, | |
"cwd": "${workspaceFolder}", | |
"environment": [], | |
"externalConsole": false, | |
"MIMode": "gdb", | |
"miDebuggerArgs": "-n", | |
"targetArchitecture": "x64", | |
"setupCommands": [ | |
{ | |
"text": "set arch i386:x86-64:intel", | |
"ignoreFailures": false | |
}, | |
{ | |
"text": "dir .", | |
"ignoreFailures": false | |
}, | |
{ | |
"text": "add-auto-load-safe-path ./", | |
"ignoreFailures": false | |
}, | |
{ | |
"text": "-enable-pretty-printing", | |
"ignoreFailures": true | |
} | |
] | |
} | |
] | |
} |
settings.json
{ | |
"search.exclude": { | |
"**/.git": true, | |
"**/.svn": true, | |
"**/.DS_Store": true, | |
"**/drivers": true, | |
"**/sound": true, | |
"**/tools": true, | |
"**/arch/alpha": true, | |
"**/arch/arc": true, | |
"**/arch/c6x": true, | |
"**/arch/h8300": true, | |
"**/arch/hexagon": true, | |
"**/arch/ia64": true, | |
"**/arch/m32r": true, | |
"**/arch/m68k": true, | |
"**/arch/microblaze": true, | |
"**/arch/mn10300": true, | |
"**/arch/nds32": true, | |
"**/arch/nios2": true, | |
"**/arch/parisc": true, | |
"**/arch/powerpc": true, | |
"**/arch/s390": true, | |
"**/arch/sparc": true, | |
"**/arch/score": true, | |
"**/arch/sh": true, | |
"**/arch/um": true, | |
"**/arch/unicore32": true, | |
"**/arch/xtensa": true | |
}, | |
"files.exclude": { | |
"**/.*.*.cmd": true, | |
"**/.*.d": true, | |
"**/.*.o": true, | |
"**/.*.S": true, | |
"**/.git": true, | |
"**/.svn": true, | |
"**/.DS_Store": true, | |
"**/drivers": true, | |
"**/sound": true, | |
"**/tools": true, | |
"**/arch/alpha": true, | |
"**/arch/arc": true, | |
"**/arch/c6x": true, | |
"**/arch/h8300": true, | |
"**/arch/hexagon": true, | |
"**/arch/ia64": true, | |
"**/arch/m32r": true, | |
"**/arch/m68k": true, | |
"**/arch/microblaze": true, | |
"**/arch/mn10300": true, | |
"**/arch/nds32": true, | |
"**/arch/nios2": true, | |
"**/arch/parisc": true, | |
"**/arch/powerpc": true, | |
"**/arch/s390": true, | |
"**/arch/sparc": true, | |
"**/arch/score": true, | |
"**/arch/sh": true, | |
"**/arch/um": true, | |
"**/arch/unicore32": true, | |
"**/arch/xtensa": true | |
}, | |
"[c]": { | |
"editor.detectIndentation": false, | |
"editor.tabSize": 8, | |
"editor.insertSpaces": false | |
}, | |
"C_Cpp.errorSquiggles": "Disabled" | |
} |
tasks.json
{ | |
// See https://go.microsoft.com/fwlink/?LinkId=733558 | |
// for the documentation about the tasks.json format | |
"version": "2.0.0", | |
"tasks": [ | |
{ | |
"label": "vm", | |
"type": "shell", | |
"command": "qemu-system-x86_64 -kernel ${workspaceFolder}/arch/x86/boot/bzImage -initrd ../rootfs.cpio.gz -S -s -nographic -append \"console=ttyS0\"", | |
"presentation": { | |
"echo": true, | |
"clear": true, | |
"group": "vm" | |
}, | |
"isBackground": true, | |
"problemMatcher": [ | |
{ | |
"pattern": [ | |
{ | |
"regexp": ".", | |
"file": 1, | |
"location": 2, | |
"message": 3 | |
} | |
], | |
"background": { | |
"activeOnStart": true, | |
"beginsPattern": ".", | |
"endsPattern": ".", | |
} | |
} | |
] | |
}, | |
{ | |
"label": "build linux", | |
"type": "shell", | |
"command": "make", | |
"group": { | |
"kind": "build", | |
"isDefault": true | |
}, | |
"presentation": { | |
"echo": false, | |
"group": "build" | |
} | |
} | |
] | |
} |
# start_kernel 分析
Linux 内核的起点是 start_kernel 函数,因此先在 start_kernel 处打断点,启动调试,程序在断点处暂停,从 start_kernel 开始进行跟踪分析。单步跳过进行跟踪分析,发现 0 号进程 init_task 被设为整个系统的初始进程,即 0 号进程是手工创建的,其他进程都是 0 号进程创建的。在内核引导时,init_task 会被创建并启动,是所有其他进程的起点。
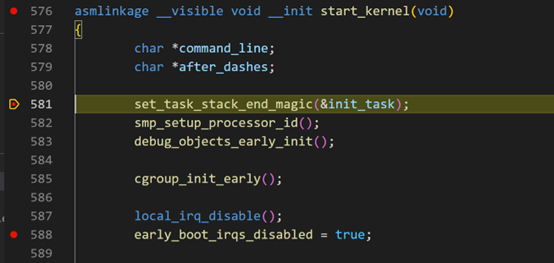

继续单步跳过,start_kernel 执行各种初始化操作。
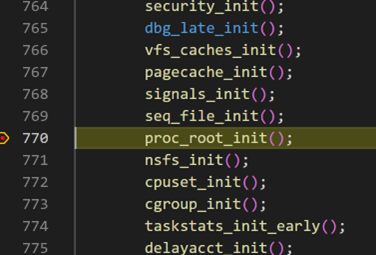

在 start_kernel () 函数末尾,arch_call_rest_init () 函数体内为 rest_init () 函数,因此设置一个 rest_init 函数断点,进入 rest_init 函数体内,该函数由 0 号进程执行。


kernel_thread 函数创建 kernel_init,对应 1 号进程,是所有用户进程的祖先。
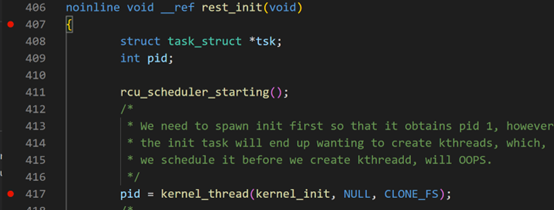

接着 kernel_thread 函数创建 kthreadd,对应 2 号进程,是所有内核进程的祖先。


进入 kernel_thread 函数查看,该函数通过 do_fork 函数创建进程。通过 kernel_thread 函数代码可以看到 1 号进程和 2 号进程最终都是通过 do_fork 创建的,用户态通过系统调用 fork 创建一个进程最终也是通过 do_fork 来完成的。


进程的创建过程大致是父进程通过 fork 系统调用进入内核_do_fork 函数,复制进程描述符及相关进程资源(采用写时复制技术)、分配子进程的内核堆栈并对内核堆栈和 thread 等进程关键上下文进行初始化,最后将子进程放入就绪队列,fork 系统调用返回;而子进程则在被调度执行时根据设置的内核堆栈和 thread 等进程关键上下文开始执行。
查看 kernel_init 函数定义,如下图的代码实现部分会调用 run_init_process 函数。
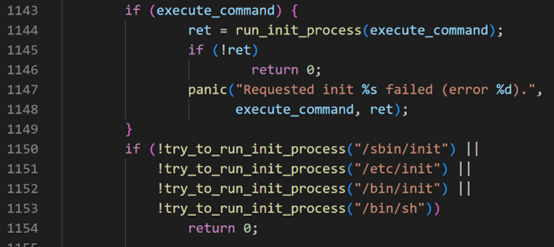

run_init_process 函数如下,其中 do_execve 用于加载可执行文件、运行 init 程序并执行 exec 系统调用。1 号进程完成用户态初始化。


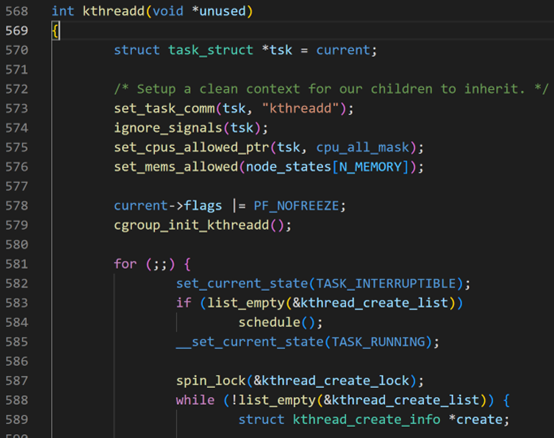
查看 kthreadd 函数定义。2 号进程创建并完成初始化。
